A cabled heart sweater is a stunning and heartfelt crochet project that combines warmth with elegant texture. By using post stitches and clever shaping, you can create a raised heart design right on the front of your sweater — perfect for special occasions, gifts, or just expressing your style. While cables may seem tricky, this guide breaks it down step-by-step.
Materials Needed:
- Worsted or aran weight yarn (approx. 1000–1500 yards depending on size)
- Crochet hook (5 mm or size to match gauge)
- Yarn needle
- Stitch markers
- Measuring tape
- Scissors

Skills & Stitches Used:
- Chain (ch)
- Single crochet (sc)
- Double crochet (dc)
- Front post double crochet (fpdc)
- Back post double crochet (bpdc)
- Foundation single crochet (optional)
- Basic shaping (increasing/decreasing)

Step-by-Step Guide:
1. Swatch and Plan
- Crochet a gauge swatch using double crochet and your chosen yarn.
- Decide on the sweater’s shape: oversized, fitted, or cropped.
- Use a basic rectangle-based construction (front panel, back panel, two sleeves).
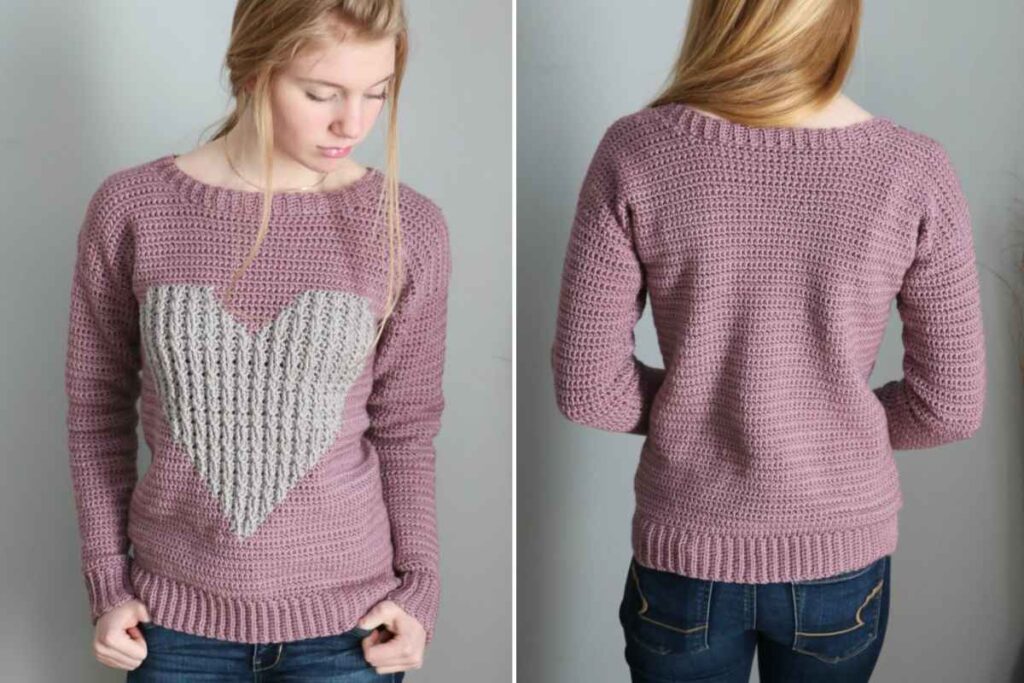
2. Create the Heart Cable Panel
- On the front panel, plan a central space for your cabled heart design.
- Use post stitches to create raised lines that form a heart shape.
- Example:
- Start with a row of dc.
- On subsequent rows, work fpdc or bpdc in a charted heart pattern (you can draw a heart shape on graph paper and treat each square as one stitch).
- The heart design is usually about 10–15 stitches wide, centered across the chest.
3. Crochet the Front and Back Panels
- Work the back panel in plain dc or a stitch pattern of your choice (same size as front).
- The front panel includes the cabled heart in the center.
- Shape the neckline by skipping stitches in the last few rows or creating a scoop/boat neck depending on your style.
4. Make the Sleeves
- Sleeves can be crocheted as tapered rectangles.
- Start at the cuff and increase slightly every few rows to shape.
- Length can be short, ¾, or full-length depending on your design.
5. Assemble the Sweater
- Block all pieces if needed.
- Seam the shoulders first using whip stitch or slip stitch join.
- Attach the sleeves to the body.
- Seam underarms and down the sides of the sweater.
6. Add Ribbing or Finishing
- Optional: Add ribbing at the cuffs, hem, and neckline using front and back post double crochet.
- You can also finish with a row of sc or reverse sc (crab stitch) for a clean edge.
Tips for Success:
- Use a stitch chart or graph to map your heart cable — easier than guessing.
- Practice fpdc/bpdc before starting the full design if you’re new to cables.
- Choose solid-colored yarn to show off the texture.
- Keep your tension even, especially around the cables.
Conclusion:
A crocheted cabled heart sweater is more than just cozy—it’s a statement of skill, care, and creativity. With basic shaping, textured stitches, and a little planning, you can create a beautiful handmade sweater with a standout heart motif right at the center. It’s a piece you’ll treasure and wear proudly.
Pattern and tutorial by MJ’s Off The Hook Designs