Transform your space with a crochet area rug—a cozy statement piece, a unique conversation starter, and a beautiful touch of personality for your home.

THE CROCHET AREA RUG
If you’re looking to cozy up hardwood floors or bring a pop of character to a neutral space, a handmade crochet area rug is the perfect solution. Blending beauty, warmth, and expert craftsmanship, these rugs showcase timeless techniques enhanced by contemporary color schemes. Creating your own crochet rug is a fulfilling project that merges creativity with practicality.
Discover the simple steps and insider tips for crafting your own colorful crochet area rug, inspired by the design showcased in the video tutorial below.
Choosing the Right Yarn
When choosing yarn for a crochet area rug, durability is key. Rugs endure heavy foot traffic, so delicate threads won’t cut it. Instead, go for sturdy fibers like cotton, bulky acrylic, or recycled t-shirt yarn. These materials not only stand up to wear and tear but also deliver sharp stitch definition. Cotton yarn is highly absorbent and retains its shape, making it ideal for bathroom or kitchen rugs. Recycled yarn offers an eco-friendly option with a rustic charm, perfect for bohemian or farmhouse-style spaces. Don’t shy away from bold colors—your rug can be a vibrant statement piece. Combine earthy browns, leafy greens, bright turquoise, and warm yellows, as seen in the featured pattern, to craft a stunning mosaic for your floor.

Picking a Pattern That Pops: Mosaic Crochet Magic
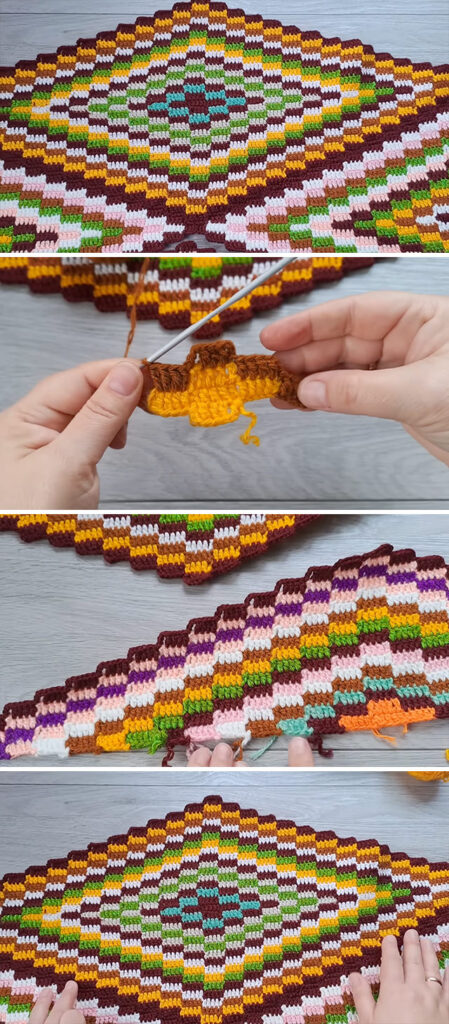
The highlight of the tutorial is mosaic crochet—a stunning technique that appears complex but is delightfully beginner-friendly. By combining contrasting colors in offset rows, it forms pixel-like patterns reminiscent of classic woven textiles. The result is bold, geometric, and irresistibly captivating.
Begin at the center, typically with a magic circle, and work outward in rounds. With each row, the pattern gains momentum, unveiling a mesmerizing display of colors and shapes. Maintaining consistent stitch height and tension is crucial, particularly when transitioning between colors. Embrace creativity—mosaic crochet beautifully accommodates both symmetrical and abstract designs, allowing your artistic vision to truly stand out.
Tools You’ll Need
Your crochet hook is like a magic wand, but it’s just one of the essential tools in your kit. Choose a 2.5mm crochet hook based on the thickness of your yarn. Keep a pair of sharp scissors nearby, and use stitch markers to easily track pattern repeats. Don’t skip blocking mats—they’re crucial for achieving a polished finish. Rugs tend to curl or warp during stitching, but proper blocking ensures flat corners and clean edges.
To enhance slip resistance, particularly on hardwood or tile floors, consider attaching a latex rug backing or sewing on a non-slip rug pad. This simple addition elevates your crochet rug from purely decorative to highly functional.
Crafting the Base of Crochet Area Rug
Start with a sturdy foundation round, ensuring consistent increases for a balanced shape. This initial step establishes the framework for the entire project. Incorporate double crochet stitches to achieve both durability and efficiency. These stitches create a pleasant texture while maintaining a flat, safe surface. As the design expands, alternate between light and dark hues to amplify the depth and create a striking 3D effect.
For beginners, using a printed graph or color chart is a wise choice. Pay close attention to your stitch count, as the placement of each stitch is key to achieving a sharp, clean motif. The beauty of mosaic crochet lies in its precision. Even a single misplaced stitch can disrupt the pattern’s symmetry, so take your time, relax, and savor the process.
Finishing Touches
After finishing your design, it’s time to enhance it with a border. Beyond its visual appeal, a border stabilizes the edges and gives your work a polished finish. A basic single crochet border can beautifully frame your intricate pattern, much like a gallery frame highlights artwork. For a more textured, rope-like effect, consider using the crab stitch (reverse single crochet) to elevate the overall look.
Blocking is essential. Gently mist your rug with a spray bottle, secure it to a blocking mat, and allow it to dry fully. This technique smooths out bumps, aligns stitches, and elevates your piece to a polished, professional finish.
Want an extra dose of flair? Tassels or pom-poms at the corners can add a playful touch, especially for nursery or boho spaces.
Styling Your Crochet Area Rug at Home
Your crochet area rug is now a masterpiece—so let it shine! Place it under a coffee table to anchor your living room, or let it greet guests by the entryway. Small versions make lovely bedside mats, while larger rugs create cozy reading nooks.
Because of its visual complexity, pair your crochet rug with neutral-toned furniture to let the pattern breathe. Let your rug be the focal point. Its rich textures and bold patterns invite touch and admiration.
Tips to Maintain and Clean
Handmade rugs deserve gentle care. Shake it out regularly and spot-clean with a damp cloth and mild soap. For deeper cleans, hand-wash and lay flat to dry. Avoid wringing—it can distort the shape. If you’ve used cotton or acrylic yarns, they’ll hold up beautifully over time.
Avoid placing your crochet area rug in high-moisture areas unless you’re confident in your yarn’s resilience. And always store it flat if not in use—folding can leave permanent creases.
Why You’ll Love Making Crochet Area Rugs
Crocheting your own rug isn’t just a fun project—it’s a way to connect with tradition while adding modern flair to your home. Every stitch is infused with intention, and every row builds toward something functional and fabulous. Whether you’re a novice or a seasoned stitcher, making a crochet area rug lets you flex your creativity while creating something you’ll use and love for years.
Embrace the artistry. Dive into the rhythm of the hook. Let your next masterpiece start from the ground up.
Tutorial and photos of this crochet area rug by: Елена Васильева Вязание крючком и спицами.